tinyapps.org / docs / Installing Luigi Rizzo's Standalone Kindle Terminal


Warning

These directions are current as of February 2011 and worked well for me. They may not work for you, and might even destroy your Kindle. At the very least, they definitely void your warranty. Proceed at your own risk (and joy).

Environment

Why?

Directions

  1. Download Yifan Lu's Kindle Jailbreak (more info)
    1. Extract the update bin for your model (e.g., update_jailbreak_0.3_k3w_install.bin) to the root of the Kindle USB drive.
    2. On the Kindle, press Menu, choose Settings, press Menu again and choose Update Your Kindle. The Kindle will reboot.
  2. Download NiLuJe's kindle-usbnetwork-0.30.N.zip (more info)
    1. Extract the update bin for your Kindle (e.g., update_usbnetwork_0.30.N_k3w_install.bin) to the root of the Kindle USB drive.
    2. On the Kindle, press Menu, choose Settings, press Menu again and choose Update Your Kindle. The Kindle will reboot.
  3. Download Luigi Rizzo's standalone Kindle terminal
    1. Extract myts.arm, launchpad.ini, and keydefs.ini to a folder (we'll use "kiterm") on the root of the Kindle USB drive
  4. On the Kindle, go to: Menu > Search
    1. Type ;debugOn and press the Return key (don't confuse the Return key, which looks something like ↵, with the center button of the 5-way controller as I did)
    2. Type ~usbNetwork and press the Return key
  5. The following dialog box will appear on the Mac:
    A new network interface has been detected. The "RNDIS/Ethernet Gadget" network interface has not been set up. To set up this interface, use Network Preferences.
    Click "Network Preferences..." and configure IPv4 manually (IP Address: 192.168.2.1, Subnet Mask: 255.255.255.0)
  6. In OS X Terminal:
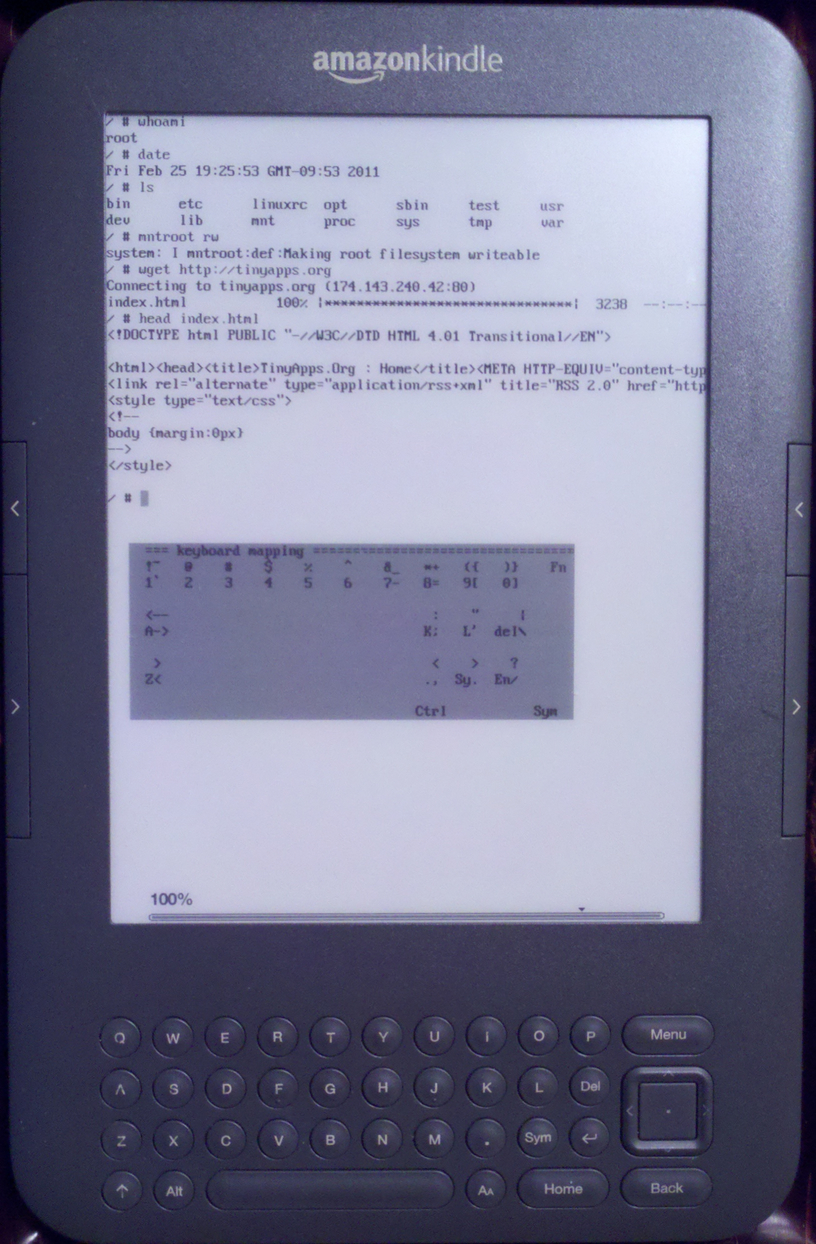
    $ telnet 192.168.2.2
    Trying 192.168.2.2...
    Connected to 192.168.2.2.
    Escape character is '^]'.
    
    Welcome to Kindle!
    
    #################################################
    #  N O T I C E  *  N O T I C E  *  N O T I C E  #
    #################################################
    Rootfs is mounted read-only. Invoke mntroot rw to
    switch back to a writable rootfs.
    #################################################
    [root@kindle root]#
  7. Let's test the standalone Kindle terminal:
    1. In OS X Terminal: # /mnt/us/kiterm/myts.arm
    2. On the Kindle: press Shift, let go, and press T. The standalone Kindle terminal should start 📺
  8. Next we'll set terminal mode to startup automatically on boot, following Kevin's excellent instructions:
    1. Make the Kindle root filesystem writable ([root@kindle root]# mntroot rw)
    2. Save the following script on the Kindle as /etc/init.d/kiterm (remember to make it executable with chmod +x /etc/init.d/kiterm):
      #! /bin/sh
      # /etc/init.d/kiterm
      case "$1" in
        start)
          echo "Starting kiterm "
          /mnt/us/kiterm/myts.arm &
          ;;
        stop)
          echo "Stopping kiterm "
          killall myts.arm
          ;;
        *)
          echo "Usage: /etc/init.d/kiterm {start|stop}"
          exit 1
          ;;
      esac
      exit 0
    3. Add a link in /etc/rc5.d on the Kindle so that kiterm starts automatically at boot (and late enough that the launchpad keyboard hooks register):
      # ln -s /etc/init.d/kiterm /etc/rc5.d/S97kiterm
    4. Reboot the Kindle (Menu > Settings > Menu > Restart). You can now enter terminal mode anytime by pressing Shift, letting go, and pressing T. Exit terminal mode by pressing the Previous Page button on the left side of the Kindle.

Notes

1. Xqtftqx has tweaked Luigi's code to make the terminal full screen.

2. Key mappings can be found (and tweaked) in keydefs.ini. Here are the primary ones:
Ctrl = AA (aka Symbol)
Esc  = Left Next Page

.------------------------.     .----------------------.
| Key   Back  Back+Shift |     | Key   Alt  Alt+Shift |
+------------------------+     +----------------------+
|  Q      `        ~     |     |  Q     1      !      |
|  A     Tab   Back Tab  |     |  W     2      @      |
|  Z      <        >     |     |  E     3      #      |
|  U      -        _     |     |  R     4      $      |
|  I      =        +     |     |  T     5      %      |
|  O      [        {     |     |  Y     6      ^      |
|  P      ]        }     |     |  U     7      &      |
|  K      ;        :     |     |  I     8      *      |
|  L      '        "     |     |  O     9      (      |
| Del     \        |     |     |  P     0      )      |
|  .      ,        <     |     '----------------------'
| Sym     .        >     |
| Ret     /        ?     |
'------------------------'
3. By default, the Kindle's rootfs is mounted as read-only. Make it writable with:
mntroot rw
and switch back to read-only via:
mntroot ro

4. Other guides of possible interest: 5. For those who just want a simple note app for their Kindle without having to root it, Notepad looks promising. Be aware that it has a 3100 character limit per note. More information.

created: 2011.02.25, updated: 2014.02.23