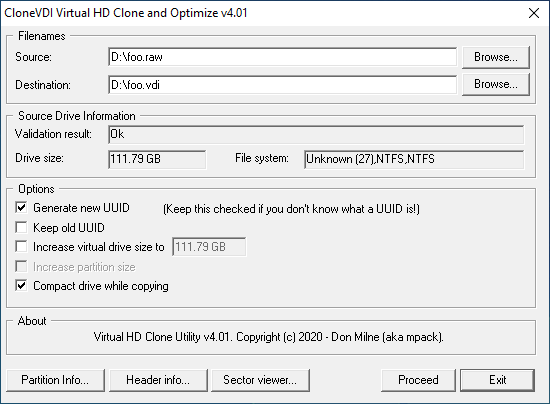
Select source (symlinks are supported; see §2.4) and destination, check "Compact drive while copying", then click "Proceed":
Create a new virtual machine in VirtualBox, selecting foo.vdi as the virtual hard disk.
This guide covers VirtualBox 7 hosts, though much of the material is platform agnostic.
Generally located in "C:\Program Files\Oracle\VirtualBox\", /usr/local/bin/, or /usr/bin/.
Create VDI directly from offline hard drive:
# vboxmanage convertfromraw /dev/sdx foo.vdi --format VDI
or image the drive first, e.g.,
# dd if=/dev/sdx of=foo.dd bs=1M status=progress
then convert to VDI:
# vboxmanage convertfromraw foo.dd foo.vdi --format VDI
# chown user foo.vdi
Create a new virtual machine in VirtualBox, selecting foo.vdi as the virtual hard disk.
Copies "[o]nly disk areas that contain useful data...while unused areas of the disk are not copied". Generated an ~30% smaller file than VBoxManage, qemu-img, and WinImage in testing.
Select "P2V" → Next
Select "Physical Disk" → Next
Click the drop down menu under "Select disk" and select desired disk
Select desired volumes → Next
Select "Local file" → Next
Select "VMDK"1 → Next
Select "VMWare Workstation growable image" → Next
Enter desired file name and path (e.g., C:\Users\user\foo.vmdk) then click "Convert"
Create a new virtual machine in VirtualBox, selecting foo.vmdk as the virtual hard disk.
Covered back in 2012, this Green Award winner reads VDI, VHD(X), VMDK, Parallels HDD, RAW, and physical drives, and writes to VDI (among many other features including compacting, repairing, enlarging, and diagnosing virtual disks). Like StarWind V2V, the resultant VDI file was ~30% smaller than those created by VBoxManage, qemu-img, and WinImage.
Select source (symlinks are supported; see §2.4) and destination, check "Compact drive while copying", then click "Proceed":
Create a new virtual machine in VirtualBox, selecting foo.vdi as the virtual hard disk.
qemu-img offers yet another option for converting raw to VMDK or VDI (among many other abilities), e.g., qemu-img convert foo.dd -O vmdk -p foo.vmdk. Compile from source, apt install qemu-utils in Debian-based distros, or grab a Windows binary from Cloudbase.
WinImage (mentioned last year) is a portable shareware app in continuous development since 1993(!) that can perform P2V, V2P, and V2V operations via the Disk menu (unmentioned in the documentation as of March 2023).
For live systems, native or lighweight/portable apps are essential; "Primum non nocere".
Tiny portable app from Sysinternals
Extract and run on a live Windows system2, selecting desired volume(s)3 and destination, unchecking "Use Vhdx"4, and checking "Use Volume Shadow Copy":

Create a new virtual machine in VirtualBox, selecting foo.vhd as the virtual hard disk.
Tested under Windows 10 22H2.
In Disk Management (diskmgmt.msc), create a VHD file (e.g., E:\foo.vhd) large enough to accommodate the system image, then initialize, create new simple volume, assign drive letter (e.g., V:), and format as NTFS (the required file system for System Image disk destinations); it should mount automatically, but if not, mount manually via Action → Attach VHD.
Control Panel → System & Security → Backup and Restore (Windows 7) → Create a system image5
Select "On a hard disk" → choose V: as the destination from the drop down menu → Next → Next → Start backup
When the backup is complete6, eject V:.
Create a new VM in VirtualBox with a blank drive ≥ the original drive7. Attach foo.vhd and a Windows, WinPE, or system repair disc ISO image in the VM's settings before booting.
Boot VM from ISO image → set language and other preferences → Next → Repair your computer → Troubleshoot → System Image Recovery → "Use the latest available system image(recommended)" → Next → Next → Finish → Yes
Prepare a VHD file as in §2.2, step 1
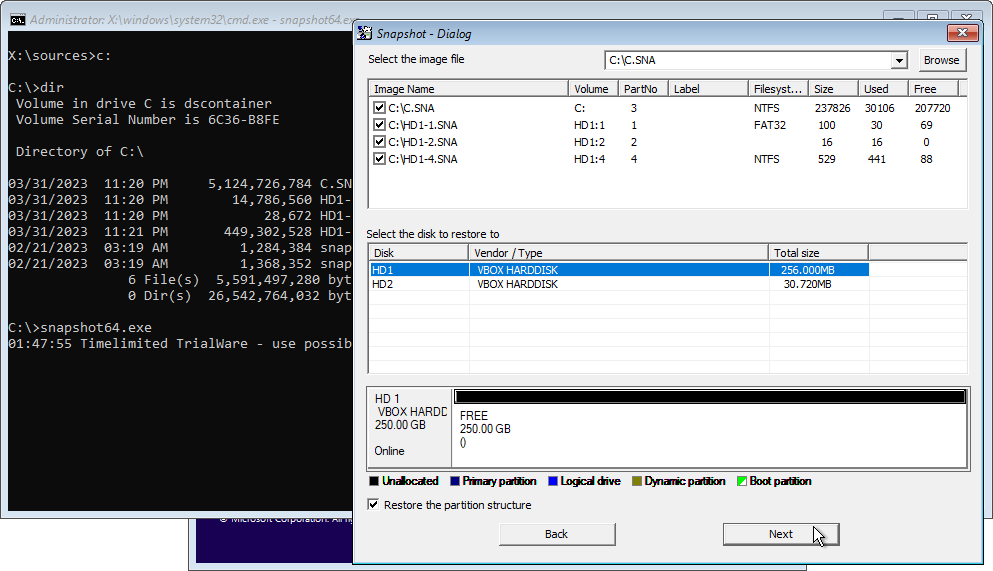
Back up the live system via Drive Snapshot to V:, copying snapshot.exe (or snapshot64.exe for 64-bit recovery environments) there as well.
Eject V: when backup is complete.
Create a new VM as in §2.2, step 5
Boot VM from ISO image 8
Launch snapshot.exe (or snapshot64.exe) → Restore complete Disk from Images → Browse → double click one of the SNA files created in step 2 → select the blank virtual disk to restore to (e.g., HD1) → Next → Yes:
Although the functionality is billed as "extremely rudimentary", CloneVDI can virtualize a running system by specifying the corresponding hard disk symlink (e.g., "\\.\PhysicalDrive0") as the source9. Unlike the preceding tools in this section, VSS is unsupported, so caution is warranted; from the release notes:
[I]t is up to you to use it sensibly. In particular you should have no other applications running (certainly nothing that creates and/or writes to files), and the clone should be written to a different drive.
Miray HDClone (covered in 2020) Professional and Enterprise versions can purportedly image live systems to VMDK/VHD(X)/VDI. Cold cloning also supported.
Hot Cloning of Physical and Virtual Powered On Machines: "With [VMWare vCenter] Converter Standalone, you can perform hot cloning." See Using VMware vCenter Converter Standalone 6.3 and How to Perform P2V and V2V Migration with VMware Converter.
5nine V2V Easy Converter was acquired and folded into Acronis, while Microsoft Virtual Machine Converter was retired.
Change storage controller type (e.g., from AHCI to PIIX4 for IDE) to match original system in Settings → Storage
Enable (or disable) I/O APIC in Settings → System → Extended Features
Disable Hyper-V on host and guest via GUI (C:\Windows\System32\OptionalFeatures.exe) or CLI (bcdedit /set hypervisorlaunchtype off)
Disable 3D Acceleration in Settings → Display → Extended Features
Change Graphics Controller (VBoxVGA/VMSVGA/VBoxSVGA) in Settings → Display
Change number of CPUs in Settings → System → Processor → Processors
Increase RAM in Settings → System → Motherboard → Base Memory
Increase video RAM in Settings → Display → Screen → Video Memory
Enable (or disable) EFI to match original partition scheme in Settings → System → Motherboard → Extended Features
Change chipset in Settings → System → Motherboard → Chipset
Typically due to incompatible storage controller settings
Boot from Windows ISO
Launch regedit via command prompt10
Select HKEY_LOCAL_MACHINE → File → Load Hive... → navigate to \Windows\System32\config\system in your VM's C: drive → Open → enter a Key Name (e.g., "foo") → OK
Navigate to HKEY_LOCAL_MACHINE\foo\ControlSet001\services\ and change the Start value data11 along these lines (may vary slightly based on hardware):
Select HKEY_LOCAL_MACHINE\foo\ → File → Unload Hive... → Yes → restart
Query current value from command line or batch file: reg query "HKLM\foo\ControlSet001\Services\aliide" /v Start
Add/edit value from command line or batch file: reg add "HKLM\foo\ControlSet001\Services\aliide" /v Start /t REG_DWORD /d 3 /f
How does CurrentControlSet differ from ControlSet001 and ControlSet002?
For Windows XP, create a BartPE-based ISO via Ultimate Boot CD for Windows 3.60 (Softpedia mirror) and run the included fix_hdc.cmd (Start → Programs → Registry Tools → FIX_hdc); it's based on FixIDE12 by Markus Debus, which in turn is based on the procedure outlined in KB314082, You receive a Stop 0x0000007B error after you move the Windows XP system disk to another computer.
cdob (author of fix_hdc) comments in FIX_HDC needs TXTSETUP.SIF for Win7x64 DP_MassStorage_wnt6-x64
See also cdob's updated version for Windows 7: fix_7hdc.vbs
Fix: BSOD Error 0x0000007B on Boot on Windows 7 and Server 2008 R2
You receive a Stop 0x0000007B error after you move the Windows XP system disk to another computer
Nir Sofer's DevManView can "load the devices list from external instance of Windows and disable unwanted devices".
Enable (or disable) I/O APIC
Enable (or disable) EFI to match original partition scheme
Boot from Windows ISO and run bootrec or bootcfg (Windows XP) commands (e.g., bootrec /rebuildbcd)
"This device cannot find enough free resources that it can use. (Code 12)"
VBoxManage internalcommands sethduuid "path/to/foo"List VMs: VBoxManage list vms
Retrieve extra data values: VBoxManage getextradata foo
Delete extradata via vboxmanage by "running the same command without the delimiter (no value)."
Mounting VDI files
In fieri
What disk image should I use with VirtualBox, VDI, VMDK, VHD or HDD? ↩
The current version, 2.02, is said to run "on Windows Vista, Windows Server 2008, and higher, including x64 systems", but under Vista returned "Error: This version of Disk2VHD Requires Windows 7 or higher to function.: The specified program requires a newer version of Windows." Version 2.01 ran successfully under Vista and XP. ↩
For GPT-partitioned disks, be sure to include the EFI System Partition (ESP) volume, which is required to boot Windows. ↩
VirtualBox 4-7 offer read support for VHDX but not write support. ↩
You will also be prompted to create a system repair disc when the backup is complete. A physical or virtual CD/DVD burner is required, as writing directly to ISO is not supported. ↩
Failure to do so results in "The system image restore failed. Error details: The computer needs to be restarted to finish preparing a hard disk for restore. To continue, restart your computer and run the restore again. (0x80042403)" ↩
A floppy image can be used instead (though the CLI may be less intuitive): "Using the windows commandline, expand networkbootdiskette.sna with the (undocumented) command c:\programs\snapshot> snapshot networkbootdiskette.sna bootdisk.img -X" ↩
A list of physical disk symlinks can be obtained via wmic diskdrive list brief. ↩
Vista: Shift+F10 only works after clicking Next → "Install now". XP: Shift+F10 is unavailable; even reg.exe is unsupported in Recovery Console - BartPE, sysinternals boot disc, etc. ↩
Possible values are: 0 (Boot), 1 (System), 2 (Auto load), 3 (Load on demand), 4 (Disabled), and 5 (Delayed start). See Table 1. Values for the Start Registry Entry (source appears to be "Table 28-3: Values for a <servicename> Start Entry" on page 1252 of Microsoft Windows XP Professional Resource Kit Documentation) for more information. ↩
There is another, similar tool with the same name. ↩
created: 2023.05.23