From within Windows (or OS X) via Timothy Sutton's Brigadier Python script
From within OS X via Boot Camp Assistant > Action > Download Windows Support Software
From within a browser (for Windows 7/Boot Camp 4 & 5.1) via this Apple page
/mac | Dec 10, 2016
Received "Failed to write data to disk" error at end of cloning process followed shortly by "Cloning succeeded".
On reboot, the following message appeared:
Windows failed to start. A recent hardware or software change might be the cause. To fix the problem:
1. Insert your Windows installation disc and restart your computer.
2. Choose your language settings, and then click "Next."
3. Click "Repair your computer."
If you do not have this disc, contact your system administrator or computer manufacturer for assistance.
File: \EFI\Microsoft\Boot\BCD
Status: OxcOOOOOOf
Info: An error occurred while attempting to read the boot configuration data.
Windows booted normally from 4TB SSD.
* IDE/ATA was required in this account, which uses a method similar to Xcopy Windows to a new hard drive, but with ntfsclone (careful with syntax - the target is specified before the source, as explained in the man page:
Clone NTFS on /dev/hda1 to /dev/hdc1:
ntfsclone --overwrite /dev/hdc1 /dev/hda1)
† Destination disk is larger than 2 TB: If "My source disk is MBR and my OS supports UEFI" and "My system is UEFI-booted (Windows or Acronis Bootable Media)" then "partition style on your destination disk will be converted to GPT automatically. This disk may be used for booting in UEFI. Also, the entire disk space will be available."
/windows | Dec 03, 2016
Thanks to LordNeckbeard's tip and link to FFmpeg's fade filter documentation.
UPDATE:
Add fade in and fade out:
$ ffmpeg -i in.mp4 -vf "fade=in:0:10,fade=out:900:27" -acodec copy out.mp4
$ cat mp4s.txt
file '/path/to/1.mp4'
file '/path/to/2.mp4'
file '/path/to/3.mp4'

$ ffmpeg -f concat -safe 0 -i mp4s.txt -c copy out.mp4
Added -safe 0 to resolve "Unsafe file name" error.
/mac | Nov 24, 2016
Attachments can now be removed normally from affected messages. Tested in Mail 9.3 under OS X 10.11.6. Lion/Mountain Lion's Mail: Workaround for removing attachments from sent messages should have been in the top 10 Google results but wasn't, hence this recapitulation.
/mac | Nov 24, 2016
apt install lfhex, but that version is sadly plagued with a long-standing bug which hides the (very handy) "Cursor Offset" selection box:
| lfhex missing Cursor Offset | lfhex with Cursor Offset |
| |
As Kalle Olavi Niemitalo explains in the aforementioned bug report, removing statusBar()->showMessage("Ready",2000); from hexGui.cpp before compiling works, but only if you have older versions of Qt, gcc, g++, etc. to compile with (or manage to resolve compatibility problems like this one).
After several false starts, I got a x64 binary compiled under Ubuntu 12.04, gcc 4.6.3, and Qt 4.8.1. Works fine under newer Debian-based distros as well.
See also wxHexEditor, a cross-platform (Linux, Windows, OS X), open source hex editor with support for very large files (up to 2EB) and raw disk access (under POSIX systems). The current version, 0.23 beta, is available via apt install wxhexeditor.
UPDATE 1: Just noticed this on the lfhex homepage under "Limitations": "Search/compare can be slow (compared to cmp or any other non-paged IO app)". Note that cmp -s is faster than just cmp and roughly equal to diff -q. More info. Tip: If you just need to know whether two large files differ, first check the file sizes. Only then if necessary run: diff --speed-large-files --brief --report-identical-files file1 file2.
UPDATE 2: To compare two files, run lfhex -c file1 file2 (there isn't a comparison option within the GUI, though the preceding command will launch the GUI in comparison mode).
/nix | Nov 05, 2016
Quitting and restarting Photos.app only worked for a few more files, then back to the same error message. File > Import... did not work either.
Happily, PowerPhotos was able to import everything (over 100GB worth), automatically skipping duplicates and providing a detailed report of the process via Library > Import Photos...
/mac | Oct 26, 2016
/nix | Oct 24, 2016
/misc | Oct 19, 2016
Install SSD. Any existing data will be deleted.
Boot from Mavericks installer
Disk Utility > Partition (GUID), format (Mac OS Extended (Journaled)), and name (OSX) volume
Install Mavericks to OSX normally
Boot from SSD
Boot Camp Assistant > allocate partition space as desired (keeping in mind that the Linux Mint partition will be carved out of the Windows partition)
Install Windows normally
Boot from Linux Mint 18 installer
Install Mint normally, selecting "Install Linux Mint alongside them" and specifying the desired sizes of the Windows and Mint partitions
When installation completes, boot to Startup Manager by holding the Option key. There are 3 options:
OSX = Mavericks
Recovery-10.9.5 = OS X Recovery
Windows = GNU GRUB, from which Linux Mint 18 or Windows 7 can be booted (ignore the OS X 32-bit and 64-bit entries)
Notes:
* Other models may be less Linux-friendly:
Of course, in lieu of steps 1 and 2, an existing OS X installation could be used, though the risk of data loss is very real and should be assumed.
If desired, rEFInd can be installed to manage boot options.
OS X can be installed normally to an SD card in the built-in card reader, but attempting to run Boot Camp Assistant from such a drive returns: "You cannot partition an external disk, a RAID disk or an internal disk on which FileVault encryption is in progress. Restart your computer using an internal disk that is not part of a RAID set or try it again after FileVault has completed."
Enable MacBook Pro's Broadcom wifi adapter in Linux Mint:
Lm Menu > Administration > Driver Manager > enter password
"Drivers cannot be installed. Please connect to the Internet or insert the Linux Mint installation DVD (or USB stick)."
Insert Mint media and click OK once it has mounted
"Failed to download repository information. Check your Internet connection." Click Close.
Select "bcmwl-kernel-source"
Click "Apply Changes"
Add the following to your .bashrc in Mint for slightly saner touchpad settings:
synclient TapButton1=1
synclient TapButton2=3
synclient TapButton3=2
See all options via synclient -l (e.g., enable palm detection: synclient PalmDetect=1, disable touchpad: synclient TouchpadOff=1, etc.)
/mac | Oct 18, 2016
That's it; now you've got a list of all programs easily accessible from the taskbar.
References:
/windows | Oct 11, 2016
"libguestfs can access almost any disk image imaginable. It can do it securely — without needing root and with multiple layers of defence against rogue disk images. It can access disk images on remote machines or on CDs/USB sticks. It can access proprietary systems like VMware and Hyper-V."
/nix | Oct 02, 2016
Don't install from the official repositories unless you want version 1.19 from 2014 (current version is 1.21 from 2016):
# apt install ddrescue
...
E: Unable to locate package ddrescue
# apt install gddrescue
...
Setting up gddrescue (1.19-1) ...
(Note that while the repositories refer to it as "gddrescue", it is invoked via "ddrescue" once installed.)
If you decide to compile from source, you may need Lzip to extract the contents from the ddrescue archive.
If you receive an error like this one while running make:
c++ -W -O2 -c -o arg_parser.o arg_parser.cc
make: c++: Command not found
Makefile:64: recipe for target 'arg_parser.o' failed
make: *** [arg_parser.o] Error 127
you need to install build-essential first:
# apt install build-essential
The rest is straightforward:
$ lzip -d ddrescue-1.21.tar.lz && tar xvf ddrescue-1.21.tar && cd ddrescue-1.21 && ./configure && make
/nix | Sep 30, 2016
/mac | Sep 11, 2016
::::::::::::::::::::::::::::::::::::::::::::
:: Automatically check & get admin rights V2
::::::::::::::::::::::::::::::::::::::::::::
@echo off
CLS
ECHO.
ECHO =============================
ECHO Running Admin shell
ECHO =============================

:init
setlocal DisableDelayedExpansion
set "batchPath=%~0"
for %%k in (%0) do set batchName=%%~nk
set "vbsGetPrivileges=%temp%\OEgetPriv_%batchName%.vbs"
setlocal EnableDelayedExpansion

:checkPrivileges
NET FILE 1>NUL 2>NUL
if '%errorlevel%' == '0' ( goto gotPrivileges ) else ( goto getPrivileges )

:getPrivileges
if '%1'=='ELEV' (echo ELEV & shift /1 & goto gotPrivileges)
ECHO.
ECHO **************************************
ECHO Invoking UAC for Privilege Escalation
ECHO **************************************

ECHO Set UAC = CreateObject^("Shell.Application"^) > "%vbsGetPrivileges%"
ECHO args = "ELEV " >> "%vbsGetPrivileges%"
ECHO For Each strArg in WScript.Arguments >> "%vbsGetPrivileges%"
ECHO args = args ^& strArg ^& " "  >> "%vbsGetPrivileges%"
ECHO Next >> "%vbsGetPrivileges%"
ECHO UAC.ShellExecute "!batchPath!", args, "", "runas", 1 >> "%vbsGetPrivileges%"
"%SystemRoot%\System32\WScript.exe" "%vbsGetPrivileges%" %*
exit /B

:gotPrivileges
setlocal & pushd .
cd /d %~dp0
if '%1'=='ELEV' (del "%vbsGetPrivileges%" 1>nul 2>nul  &  shift /1)

::::::::::::::::::::::::::::
::START
::::::::::::::::::::::::::::
REM Run shell as admin (example) - put here code as you like
ECHO %batchName% Arguments: %1 %2 %3 %4 %5 %6 %7 %8 %9
cmd /k
/windows | Sep 04, 2016
Boot via Windows installation media (DVD, USB flash drive, etc)
When the "Windows Setup" window appears, press Shift + F10 to open a command prompt
Launch one of these tools from the command prompt to retrieve product key from BIOS / UEFI:
Windows OEM Product Key Tool 1.1 - Purpose-built app; simply returns the product key
FirmwareTablesView - Displays list of firmware tables; look for "MSDM" under Signature column or "Microsoft Software Licensing Table" under Description column
RWEverything - Digs deep for a plethora of hardware details; head to ACPI > MSDM > Data.
To identify which version of Windows the recovered product key corresponds to:
Ultimate PID Checker - Works with product keys from XP through 8 (not 8.1); runs inside the Windows installation environment.
ShowKeyPlus - Works with product keys from Windows 7 through 10; does not run inside the Windows installation environment. (UPDATE: Users have flagged GPL violations (to which the author nesciently replied, "GPL does not mean open source - it's freeware only."), missing source code, and cloaked network activity.)
For OEM computers still shipping with Windows 7 or 8.1 (slated to end on October 31, 2016), the firmware-embedded product key likely differs from the product key on the hard drive. Recover the latter with ProduKey.
For more information on embedded product keys, see Windows 10 Embedded Product Key Tool and Where is my Windows product key, and how can I tell that my Windows installation is genuine?
/windows | Sep 04, 2016
Sources:
/windows | Sep 04, 2016
While there are a lot of extensions for restoring backspace (delete on Mac keyboards) to its former glory, why trust an extension when this simple command line argument works?
--enable-blink-features=BackspaceDefaultHandler --test-type
Under Windows, this is as simple as changing the shortcut Target from
"C:\Program Files (x86)\Google\Chrome\Application\chrome.exe"
to
"C:\Program Files (x86)\Google\Chrome\Application\chrome.exe" --enable-blink-features=BackspaceDefaultHandler --test-type
Here are two methods for passing the argument to Chrome under OS X:
Bash: open -b com.google.Chrome --args --enable-blink-features=BackspaceDefaultHandler --test-type
AppleScript: do shell script "open -b com.google.Chrome --args --enable-blink-features=BackspaceDefaultHandler --test-type"
Save either command and run in lieu of Google Chrome.app to restore backspace functionality.
On a related note, here is how to find bundle identifiers / bundle IDs (CFBundleIdentifier):
/mac | Aug 28, 2016
While attempting to install Windows 7 on a Dell Optiplex 3040 Micro, the following error appeared:
A required CD/DVD drive device driver is missing. If you have a driver floppy disk, CD, DVD, or USB flash drive, please insert it now.
Note: If the Windows installation media is in the CD/DVD drive, you can safely remove it for this step.
Browse | OK | Cancel
(As it turns out, the problem is caused by a missing USB 3.0 driver, so installing via USB floppy, CD/DVD, flash drive, etc was not possible.)
Browsing for a driver on the virtual X: drive returned:
No device drivers were found. Make sure that the installation media contains the correct drivers, and then click OK.
Reports online did not sound promising, e.g.: 'No device drivers were found' error when installing windows 7 on new computer "FINAL EDIT - If you're here for answers, while nothing here worked for me, that doesn't mean it won't work for you, so I suggest you try everything here if you can. What I ended up doing is giving up on windows 7 and instead installed windows 10.").
Coming up with a working solution took more time than anyone else should ever have to invest in this issue again. Here's what worked for me:
Format a USB drive as NTFS. If necessary, use diskpart.exe:
list disk
select disk x, where x is the number assigned to your USB drive
clean
create partition primary
select partition 1
active
format fs=ntfs quick
assign
exit
Copy files and folders from Windows 7 ISO or DVD to USB drive
Download Intel(R) USB 3.0 eXtensible Host Controller Driver and extract contents
Click "Add" > "Image folder" > select drive letter of USB drive (E: in the example that follows) > click "Select Folder"
Under "Operating systems | install.wim", right click the version of Windows that corresponds to your license and then click "Load":
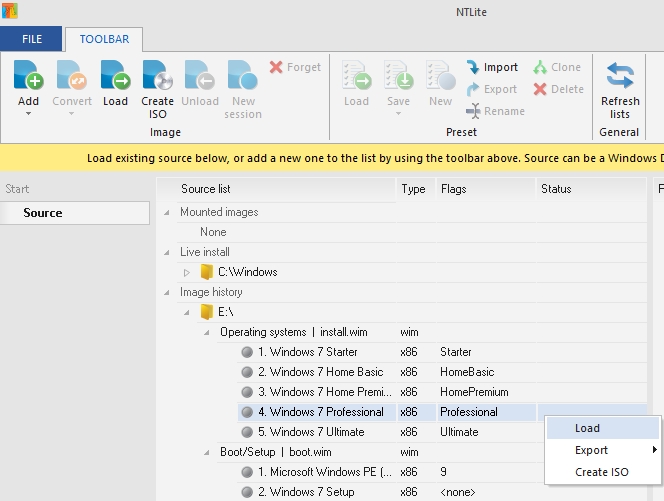
Once loading has completed, click "Drivers" in the left-hand column:
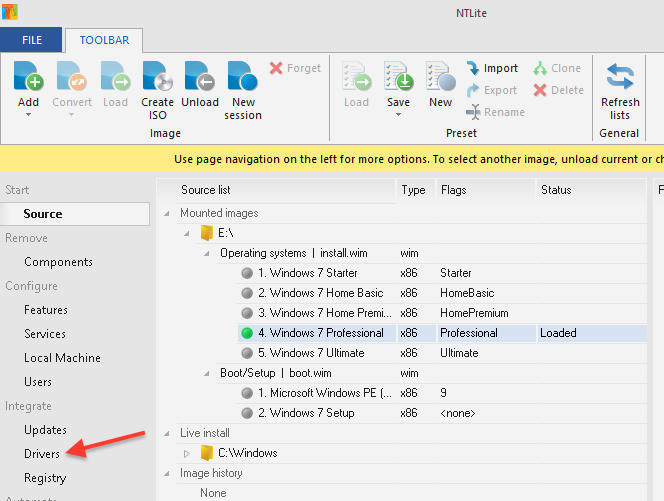
Click "Add" > "Folder with multiple drivers" > browse to the folder containing extracted driver(s) > click "Select Folder"
Click "Apply" in left-hand column > click green "Process" button at top left > "Yes"
When processing is complete, click "Source" in the left-hand column to return to the main window
Repeat steps 6 through 10 for the two entries under "Boot/Setup | boot.wim" (in the screenshots above, they are "Microsoft Windows PE (x86)" and "Windows 7 Setup")
If desired, make an ISO image of the USB drive (for burning to DVD-R, etc) by right clicking E: under "Image history" and then clicking "Create ISO"
The USB drive or ISO image can now be used to install Windows 7 on the affected computer (see below for a list of all affected Dell models)
Notes
Dell explains the cause here: Dell systems with the Intel Skylake or Braswell Chipset cannot boot to Dell Windows 7 media due to no USB 2.0 but the NTLite directions are incomplete (as of August 21, 2016) to the point of being virtually useless. In an update to their post, Dell recommends using instead:
Intel's Windows 7 USB 3.0 Creator Utility ("This utility automates the process to create a Windows 7 installation image to include USB 3.0 drivers. The new installation image can then be used to install Windows 7 on Intel® NUC products that have only USB 3.0 ports."). However, it would crash towards the end of the process and the image it created did not include the necessary USB 3.0 driver. Also, it only runs under Windows 8.1 or higher (?!) and (according to the instructions) requires Windows USB/DVD Download Tool (which Microsoft inexplicably hosts at http://wudt.codeplex.com/ and last updated in 2009), which requires Microsoft .NET Framework v2 and Microsoft Image Mastering API v2! Since v2 does not run under Windows 8.1, 3.5 was tried, but ultimately the Download Tool did not work out (nor did Rufus), though this could have been caused by running in a virtual machine (which worked fine for the process outlined above).
Fiddling with the scant USB and virtualization options in the BIOS did not avail.
Old timers will note the similarity between this issue and the Windows XP / SATA install problem from yesteryear.
Before piecing together the above procedure, used this old workaround:
Remove SATA HDD from Optiplex 3040 and install into generic PC.
Install Windows 7 normally
Shutdown at initial welcome screen (Shift+F10, shutdown -t 1 -s)
Boot generic PC once more from Windows 7 installer and use regedit to switch from IDE to AHCI mode if necessary:
Shift+F10 > regedit.exe
Load \windows\system32\config\system (which corresponds to HKEY_LOCAL_MACHINE\SYSTEM\)
Navigate to ControlSet001\services\msahci and change "Start" DWORD value from 3 to 0.
Repeat step c for ControlSet002\services\msahci
Copy missing drivers to SATA HDD
Reinstall SATA HDD into Optiplex 3040 - Windows boots normally. Install missing drivers.
Here is the current list of affected Dell computers: Latitude E7270, Latitude E7470, Latitude 3470, Latitude 3570, Latitude E5270, Latitude E5470, Latitude E5570, Latitude 7370, Latitude 7414 Rugged, Latitude 7214 Rugged, Latitude 5414 Rugged, Optiplex 7440 AIO, Optiplex 3240 AIO, Optiplex 7040, Optiplex 5040, Optiplex 3040, Precision Tower 3620, Precision Tower 3420, Precision MPWS 7510, Precision MPWS 7710, Precision MPWS 3510, XPS 9550, XPS XPS 13 9350, XPS 8900, Inspiron NB 7559, Inspiron NB 3452/3552, Inspiron NB 3459/3559, Vostro NB 5459, Inspiron DT 3059, Inspiron DT 3459, Inspiron DT 5459, Inspiron DT 3650, Inspiron DT 3250, Vostro DT 3650, Vostro DT 3653, Vostro DT 3250, Vostro DT 5450
Updates
Latest Intel, AMD chips will only run Windows 10 ... and Linux, BSD, OS X - "One example of Microsoft holding back support is the xHCI USB controller in sixth-generation Skylake and seventh-generation Kaby Lake: Windows 7 doesn't support that USB hardware, so installing the operating system from a USB stick using those chips is tricky. Intel provides xHCI drivers for Windows 7 once it's up and running."
How to Install Windows 7 with only USB 3.0 Ports outlines a similar process using dism, but assumes a preexisting USB-based Windows 7 installer.
Microsoft made 'em do it: The latest Kaby Lake, Zen chips will support only Windows 10 - ". . . the company tried to shorten its support lifecycle for Intel Skylake PCs running Windows 7 and 8, a policy the company subsequently abandoned after much outcry. But Microsoft's statements have also consistently included a critical caveat: The latest generations of silicon—specifically Intel's Kaby Lake chip, Qualcomm’s 8996, and AMD’s Bristol Ridge silicon—will all require Windows 10."
Microsoft Suspends Win 7/8.1 Updates For Intel Kaby Lake, AMD Ryzen CPUs - "Microsoft suspended updates for Windows 7 and Windows 8.1 users with Intel's 7th generation (Kaby Lake) processors, AMD's 7th generation (Bristol Ridge) processors, and Qualcomm's 8996 processor or newer. The company said before that it wouldn't release new drivers for older Windows versions to support new hardware, but now it's stopped Windows 7 and Windows 8.1 users with these new CPUs from scanning or downloading from Windows Update."
/windows | Aug 21, 2016
If a man is crossing a river
and an empty boat
collides with his own boat,
he won’t get offended or angry,
however hot-tempered he may be.
But if the boat is manned,
he may flare up, shouting and cursing,
just because there’s a rower.
Realize that all boats are empty
as you cross the river of the world,
and nothing can possibly offend you.
From chapter 43 of Stephen Mitchell's The Second Book of the Tao
/misc | Jul 19, 2016
Old Mac running OS X 10.6.8 with iPhoto 6 library containing 5,238 items
Imported data, including iPhoto Library, to new Mac running OS X 10.11.5 and Photos 1.5. via Migration Assistant.
Photos Library displayed only 1,794 photos (through September 2010), even though all photos were found in ~/Pictures/Photos Library.photoslibrary/Masters and ~/Pictures/Photos Library.photoslibrary/Previews.
Deleted Photo Library and iPhoto Library, manually copied iPhoto Library from old Mac again, relaunched both iPhoto and Photos - same result.
Attempting to run iPhoto Library Upgrader 1.1 (which "prepares libraries from iPhoto 7 or earlier so they can be upgraded with the current version of iPhoto") on yet another copy of the original iPhoto Library returned "Your library can open with the current version of iPhoto and does not need to be prepared with this tool."
Rebuilding the iPhoto library on both the old and new Mac (by holding down Command and Option while starting iPhoto, etc) did not help.
Opening yet another copy of the original iPhoto Library in iPhoto Library Manager showed only the same 1,794 photos and misidentified the library as an iPhoto 8 library.
Copied original iPhoto Library to a third Mac running OS X 10.6.8 and iPhoto 6 (all 5,238 items appeared in iPhoto).
Installed iPhoto Library Manager 3.8.6 (for Mac OS X 10.5.8 and iPhoto 7.1.5 and earlier).
iPhoto Library Manager.app > File > Rebuild Library. As Christoph Bartneck explains, "The software has a tool to recover corrupted libraries. But it works differently from Apple’s approach. It starts with a fresh clean library and imports all the photos, including their meta data, such as location, faces, date. It also manages to rebuild albums and folders."
Copied rebuilt iPhoto Library to new Mac running OS X 10.11.5.
Ran iPhoto Library Upgrader 1.1 (which now ran normally instead of returning "Your library can open with the current version of iPhoto and does not need to be prepared with this tool" as above).
Opened the upgraded iPhoto Library in iPhoto 9.6.1, which reported "This photo library needs to be upgraded to work with this version of iPhoto." After the upgrade process, all 5,238 items (including albums, metadata, etc) appeared intact!
Opened Photos.app which imported the entire iPhoto Library successfully.
Sadly, iPhoto Library Manager's successor PowerPhotos does not include a "Rebuild Library" command.
See also OSXPhotos, a "Python app to export pictures and associated metadata from Apple Photos on macOS."
/mac | Jul 18, 2016
/misc | Jul 10, 2016
/windows | Jul 09, 2016
/misc | Jul 08, 2016
Basic usage:
Sample result:
PatternName       PatternMatch
-----------       ------------
Gmail             &Email=tinyapps@gmail.com&Passwd=PASSWORD_IN_PLAINTEXT&Persiste...
mimikittenz currently extracts the following credentials from memory:
See also:
/windows | Jul 08, 2016
If you do not have the Command Line Developer Tools installed, run $ xcode-select --install to install them.
Install lzip and xz from source (1, 2), your favorite package manager (Homebrew, MacPorts, etc), or Rudix
$ sudo perl -MCPAN -e shell
cpan[1]> install grepmail
cpan[2]> exit
If, like me, you receive a "command not found" error when attempting to run grepmail, repeat steps 2-4 to resolve.
/mac | Jul 06, 2016
The hard way:
The easy way, thanks to Johann N. Löfflmann.
UPDATE: Johann has an updated version of his script on GitHub: osxapp_vers (local cache).
/mac | Jul 01, 2016
/windows | Jun 16, 2016
C:\>sigcheck.exe -tuv *

Sigcheck v2.51 - File version and signature viewer
Copyright (C) 2004-2016 Mark Russinovich
Sysinternals - www.sysinternals.com

Listing valid certificates not rooted to the Microsoft Certificate Trust List:

User\MY:
   DO_NOT_TRUST_FiddlerRoot
        Cert Status:    Valid
        Valid Usage:    Server Auth
        Cert Issuer:    DO_NOT_TRUST_FiddlerRoot
        Serial Number:  99 77 7A 3E 64 63 19 9C 4D 6D 66 75 10 EF 0E B6
        Thumbprint:     31745D49A0C3386A1387A755217FD5C9701A9607
        Algorithm:      sha256RSA
        Valid from:     12:00 AM 6/14/2015
        Valid to:       11:59 PM 6/13/2026
User\Root:
   DO_NOT_TRUST_FiddlerRoot
        Cert Status:    Valid
        Valid Usage:    Server Auth
        Cert Issuer:    DO_NOT_TRUST_FiddlerRoot
        Serial Number:  99 77 7A 3E 64 63 19 9C 4D 6D 66 75 10 EF 0E B6
        Thumbprint:     31745D49A0C3386A1387A755217FD5C9701A9607
        Algorithm:      sha256RSA
        Valid from:     12:00 AM 6/14/2015
        Valid to:       11:59 PM 6/13/2026
   Superfish, Inc.
        Cert Status:    Valid
        Valid Usage:    All
        Cert Issuer:    Superfish, Inc.
        Serial Number:  00 D2 FC 13 87 A9 44 DC E7
        Thumbprint:     C864484869D41D2B0D32319C5A62F9315AAF2CBD
        Algorithm:      sha1RSA
        Valid from:     6:25 AM 5/12/2014
        Valid to:       6:25 AM 5/7/2034
   DO_NOT_TRUST_FiddlerRoot
        Cert Status:    Valid
        Valid Usage:    Server Auth
        Cert Issuer:    DO_NOT_TRUST_FiddlerRoot
        Serial Number:  99 77 7A 3E 64 63 19 9C 4D 6D 66 75 10 EF 0E B6
        Thumbprint:     31745D49A0C3386A1387A755217FD5C9701A9607
        Algorithm:      sha256RSA
        Valid from:     12:00 AM 6/14/2015
        Valid to:       11:59 PM 6/13/2026
From the documentation:
 -t[u][v] Dump contents of specified certificate store ('*' for all stores).
          Specify -tu to query the user store (machine store is the default).
          Append '-v' to have Sigcheck download the trusted Microsoft
          root certificate list and only output valid certificates not rooted to
          a certificate on that list. If the site is not accessible,
          authrootstl.cab or authroot.stl in the current directory are
          used instead, if present.
/windows | Jun 14, 2016
"Our main business is not to see what lies dimly at a distance, but to do what lies clearly at hand." -- widely attributed to Thomas Carlyle, though a definitive source is wanting
"Now the way of life that I preach is a habit to be acquired gradually by long and steady repetition. It is the practice of living for the day only, and for the days work, Life in day-tight compartments." -- William Osler, A Way of Life; An Address to Yale Students Sunday evening, April 20th, 1913
"Take therefore no thought for the morrow: for the morrow shall take thought for the things of itself. Sufficient unto the day is the work thereof." -- Jesus, Matthew 6:34 (Greek notes)
/misc | Jun 14, 2016
"Prime95 has been a popular choice for stress / torture testing a CPU since it's introduction, especially with overclockers and system builders. Since the software makes heavy use of the processor's integer and floating point instructions, it feeds the processor a consistent and verifiable workload to test the stability of the CPU and the L1/L2/L3 processor cache. Additionally, it uses all of the cores of a multi-CPU / multi-core system to ensure a high-load stress test environment.Source and binaries available for FreeBSD, Linux, OS X, and Windows 95-10.
...
The Prime95 Wikipedia page has an excellent overview on using Prime95 to test your system and ensure it is working properly. The tips presented there should be helpful regarding how long to run the torture test and provide a solid guideline on how long to run the Prime95 stress test.
Performing a stress test is simple:
- Download the software and unzip the files to your desired location.
- Run the Prime95 executable and select "Just Stress Testing" when asked.
- The default options are sufficient to do a well balanced stress test on the system."
/misc | Jun 14, 2016
UPDATE:
unshare -Un program (among other methods; had to enable unprivileged user namespaces in Debian 10.10 via /usr/sbin/sysctl kernel.unprivileged_userns_clone=1)/windows | Jun 04, 2016
"[A] set of 40 unix commands ported to DOS."
Includes: awk, basename, cal, cat, cb, cmp, comm, cp, cut, df, diff, dtree, du, ech, ed, expand, find, grep, head, join, ls, make, more, mv, od, opts, paste, rederr, rm, sed, sort, split, tail, tee, touch, tr, unexpand, uniq, wc, which, xstr.
Note: Local cache
Source: July 4, 2002 newsletter
"No installation or uninstallation needed. Just run the EXE. No changes are made to your system."
Includes: bash, cat, cp, df, du, find, grep, gzip, less, ls, mkdir, mv, ps, pwd, rm, rmdir, tar.
Note: Project is now apparently No-install Unix Tools for Windows
Source: August 2, 2004 blog post
UnixKit for Windows
"[A] toolkit of Unixlike programs for Microsoft Windows. Unlike CygWin, it does not require installation. In fact, it leaves absolutely no traces on the host machine when you’re done using it. … Please note that I did not write any of this software. In fact, I didn’t even compile it. I simply put together a collection of Unixlike tools ported to Windows by other people, compressed most of them with UPX, slapped a clever startup script on them, tested them, and released them to the world."
Includes: arc, arj, bash, bunzip2, bzip2, bzip2recover, cat, chmod, cksum, cp, csplit, cut, dd, df, diff, du, file, find, fmt, fold, funzip, grep, gunzip, gzip, head, join, less, ln, ls, md5sum, mkdir, more, mv, nano, nl, paste, patch, pico, pr, rm, rmdir, sed, sort, split, stat, tac, tail, tar, touch, tr, tsort, uniq, unrar, unzip, uudecode, uuencode, vi, wc, wget, zip, zsh.
Note: The original link, http://jlb.twu.net/code/unixkit.php, is no longer available, and the site has been excluded via robots.txt from the Wayback Machine. Here is an archive of the homepage and here is UnixKit itself.
Source: July 29, 2004 blog post
"[P]orts of common GNU utilities to native Win32."
Includes: ansi2knr, basename, bc, bison, bunzip2, bzip2, bzip2recover, cat, chgrp, chmod, chown, cksum, cmp, comm, compress, cp, csplit, cut, date, dc, dd, df, diff, diff3, dircolors, dirname, du, echo, egrep, env, expand, expr, factor, fgrep, find, flex, fmt, fold, fsplit, gawk, gclip, gplay, grep, gsar, gunzip, gzip, head, id, indent, install, join, jwhois, less, ln, logname, ls, m4, make, makemsg, man, md5sum, mkdir, mkfifo, mknod, mv, mvdir, nl, od, paste, patch, pathchk, pclip, pr, printenv, printf, pwd, recode, rm, rman, rmdir, sdiff, sed, seq, shar, sleep, sort, split, su, sum, sync, tac, tail, tar, tee, test, touch, tr, type, uname, unexpand, uniq, unshar, uudecode, uuencode, wc, wget, which, whoami, xargs, yes, zcat.
Note: Since the ZIP file from SourceForge appears to be corrupted, I have taken the liberty of digging up an archived version from the Wayback Machine and hosting it here, with the last updates included. It is compressed with 7-Zip (ZIP size was 2.52MB vs. 1.42MB for 7z). As always, standard disclaimer applies: You are 100% responsible for your own actions. Using this site, visiting a link, downloading a program, in short, living, is done entirely at your own risk (and joy).
Source: September 24, 2005 blog post
"[P]orts of tools with a GNU or similar open source license, to modern MS-Windows (Microsoft Windows 2000 / XP / 2003 / Vista / 2008 / 7)"
Includes:
GNU utilities: bc, bison, chess, compface, cpio, coreutils (fileutils, sh-utils, stat, textutils), diffutils, doschk, ed, findutils, flex, gawk, gdbm, gcal, gengetopt, gettext, gperf, grep, groff, gsl, gzip, hello, help2man, iconv, jwhois, less, m4, miscfiles, patch, readline, regex, rx, sed, sharutils, tar, texinfo, tree, units, unrtf, wget, which.
Archivers and compressors: arc, arj, bsdtar, bzip2, gzip, lha, libarchive, unzip / zip, zlib.
Other utilities: byacc, cpuid, cygutils, file, ntfsprogs, openssl, pcre, popt, re2c, rpl, sgrep, tree, x86info.
Graphics packages: asciichart, compface, gd, jpeg, jbigkit, liburt, libungif, libpng and png utilities, libwmf, netpbm, piechart, plotutils, tiff, xpm, zimg.
Textprocessing- and postscript-related packages: a2ps, barcode, bm2font, deroff, dvidj, enscript, freetype, grap, gri, groff, indent, libxml, nenscript, pdflib, polyglotman, psutils, scribe2latex, src-highlite, t1lib, t1utils, troff2latex, ttf2pt1, unrtf.
Mathematical and statistical packages: bc, calc, crypt, fdlibm, gsl, units.
Source: September 25, 2005 blog post
"[P]rovides all the important remote network tools (SSH, X11, RDP, VNC, FTP, MOSH, …) and Unix commands (bash, ls, cat, sed, grep, awk, rsync, …) to Windows desktop, in a single portable exe file which works out of the box."
Includes: Many, with even more possible via package manager.
Source: Unix in an EXE
"[L]ightweight alternative to Cygwin. It uses a convenient NSIS installer that installs over 100 extremely useful open source UNIX applications compiled as native win32 binaries. It is designed to be as small as possible, about 18 MB, as opposed to Cygwin which can run well over 100 MB depending upon options."
Includes: basename, bash, bc, bison, bunzip2, bzip2, bzip2recover, cat, chgrp, chmod, chown, cksum, comm, cp, csplit, curl, cURL, cut, dc, dd, df, diff, diff3, dircolors, dirname, dos2unix du, egrep, env, expand, expr, factor, fgrep, flex, fmt, fold, gawk, gfind, gow grep, gsar, gzip, head, id, indent, join, jwhois, less, lesskey, ln, logname, ls, m4, make, md5sum, mkdir, mkfifo, mknod, mv, Nano, nl, od, pageant, paste, patch, pathchk, pcre3, plink, pr, printenv, printf, pscp, psftp, putty, puttygen, pwd, recode, rm, rmdir, sed, seq, sftp sha1sum, shar, sleep, sort, split, su, sum, sync, tac, tail, tar, tee, test, touch, tr, uname, unexpand, uniq, unix2dos unrar, unshar, unzip, uudecode, vim, wc, wget, whereis which, whoami, xargs, yes, zip.
"The small Linux distro known as Levinux (download ~20 MB) is a tiny virtual Linux server that runs from USB or Dropbox with a double-click (no install or admin rights required) on Macs, Windows or Linux PCs--making it the perfect controlled environment for learning Linux. Think of it as an introduction to old-skool--more relevant now then ever as Linux/Unix (*nix) gets embedded into everything (the Internet of Things – IoT)."
Includes: Same tools as BusyBox: [, [[, acpid, addgroup, adduser, adjtimex, ar, arp, arping, ash, awk, basename, beep, blkid, brctl, bunzip2, bzcat, bzip2, cal, cat, catv, chat, chattr, chgrp, chmod, chown, chpasswd, chpst, chroot, chrt, chvt, cksum, clear, cmp, comm, cp, cpio, crond, crontab, cryptpw, cut, date, dc, dd, deallocvt, delgroup, deluser, depmod, devmem, df, dhcprelay, diff, dirname, dmesg, dnsd, dnsdomainname, dos2unix, dpkg, du, dumpkmap, dumpleases, echo, ed, egrep, eject, env, envdir, envuidgid, expand, expr, fakeidentd, false, fbset, fbsplash, fdflush, fdformat, fdisk, fgrep, find, findfs, flash_lock, flash_unlock, fold, free, freeramdisk, fsck, fsck.minix, fsync, ftpd, ftpget, ftpput, fuser, getopt, getty, grep, gunzip, gzip, hd, hdparm, head, hexdump, hostid, hostname, httpd, hush, hwclock, id, ifconfig, ifdown, ifenslave, ifplugd, ifup, inetd, init, inotifyd, insmod, install, ionice, ip, ipaddr, ipcalc, ipcrm, ipcs, iplink, iproute, iprule, iptunnel, kbd_mode, kill, killall, killall5, klogd, last, length, less, linux32, linux64, linuxrc, ln, loadfont, loadkmap, logger, login, logname, logread, losetup, lpd, lpq, lpr, ls, lsattr, lsmod, lzmacat, lzop, lzopcat, makemime, man, md5sum, mdev, mesg, microcom, mkdir, mkdosfs, mkfifo, mkfs.minix, mkfs.vfat, mknod, mkpasswd, mkswap, mktemp, modprobe, more, mount, mountpoint, mt, mv, nameif, nc, netstat, nice, nmeter, nohup, nslookup, od, openvt, passwd, patch, pgrep, pidof, ping, ping6, pipe_progress, pivot_root, pkill, popmaildir, printenv, printf, ps, pscan, pwd, raidautorun, rdate, rdev, readlink, readprofile, realpath, reformime, renice, reset, resize, rm, rmdir, rmmod, route, rpm, rpm2cpio, rtcwake, run-parts, runlevel, runsv, runsvdir, rx, script, scriptreplay, sed, sendmail, seq, setarch, setconsole, setfont, setkeycodes, setlogcons, setsid, setuidgid, sh, sha1sum, sha256sum, sha512sum, showkey, slattach, sleep, softlimit, sort, split, start-stop-daemon, stat, strings, stty, su, sulogin, sum, sv, svlogd, swapoff, swapon, switch_root, sync, sysctl, syslogd, tac, tail, tar, taskset, tcpsvd, tee, telnet, telnetd, test, tftp, tftpd, time, timeout, top, touch, tr, traceroute, true, tty, ttysize, udhcpc, udhcpd, udpsvd, umount, uname, uncompress, unexpand, uniq, unix2dos, unlzma, unlzop, unzip, uptime, usleep, uudecode, uuencode, vconfig, vi, vlock, volname, watch, watchdog, wc, wget, which, who, whoami, xargs, yes, zcat, zcip.
Based on Tiny Core Linux and QEMU. Login username is "tc" and password is "foo". Once logged in, "sudo su" gets you a root prompt.
Source: A tiny Linux virtual machine that requires no installation
UPDATE:
"[A] Unix multitool that runs on Windows and Minoca OS. It is a single binary that contains many of the basic core POSIX utilities, including a Bourne shell (sh), cp, mv, sed, and many more. No installation is necessary. The entire release is a single executable, and it makes no registry changes. Simply run swiss or swiss sh to fire up a shell. The swiss sh shell knows how to execute the other applications built into the binary. To specialize swiss into a particular utility, simply rename swiss.exe to that utility. For instance, copy swiss.exe to sed.exe, and it will always act directly as sed when run."
Includes (for Windows): basename, cat, cecho (color echo), chmod, cmp, comm, cp, cut, date, dd, diff, dirname, echo, env, expr, find, grep/egrep/fgrep, head, id, install, kill, ln, ls, mkdir, mktemp, mv, nl, od, printf, ps, pwd, reboot, rm, rmdir, sed, seq, sh (Bourne shell compatible), sleep, sort, split, sum, tail, tee, test (aka [ ), time, touch, tr, true/false, uname, uniq, useradd, wc, xargs.
Source: One Thing Well
"[A] port of BusyBox to the Microsoft Windows WIN32 API. It brings a subset of the functionality of BusyBox to Windows in a single self-contained native executable. Source is available in a GitHub repository: busybox-w32"
Includes: [, [[, ar, ash, awk, base64, basename, bash, bunzip2, bzcat, bzip2, cal, cat, catv, chmod, cksum, clear, cmp, comm, cp, cpio, cut, date, dc, dd, df, diff, dirname, dos2unix, dpkg-deb, du, echo, ed, egrep, env, expand, expr, false, fgrep, find, fold, ftpget, ftpput, getopt, grep, groups, gunzip, gzip, hd, head, hexdump, id, ipcalc, kill, killall, less, ln, logname, ls, lzcat, lzma, lzop, lzopcat, man, md5sum, mkdir, mktemp, mv, nc, od, patch, pgrep, pidof, printenv, printf, ps, pwd, rev, rm, rmdir, rpm2cpio, sed, seq, sh, sha1sum, sha256sum, sha3sum, sha512sum, shuf, sleep, sort, split, stat, strings, sum, tac, tail, tar, tee, test, touch, tr, true, truncate, uname, uncompress, unexpand, uniq, unix2dos, unlink, unlzma, unlzop, unxz, unzip, usleep, uudecode, uuencode, vi, wc, wget, which, whoami, xargs, xz, xzcat, yes, zcat.
"A portable Cygwin environment with many options. It's very useful for 'static' installations too ... XServer is supported."
Includes: Cygwin defaults, plus: vim, wget, tar, gawk, and bzip2.
Notes: PAF and 7z binaries available from CybeSystems website.
"Cmder is a software package created out of pure frustration over the absence of nice console emulators on Windows. It is based on amazing software, and spiced up with the Monokai color scheme and a custom prompt layout. Looking sexy from the start."
Includes: Same tools as Git for Windows (see below)
Note: Mini version (5.7MB) does not contain *nix tools; full version (80.3MB) does, courtesy of Git for Windows. Both versions are portable.
Source: Comment by CleanDatacntrForFood
"Git for Windows focuses on offering a lightweight, native set of tools that bring the full feature set of the Git SCM to Windows while providing appropriate user interfaces for experienced Git users and novices alike."
Includes (among others): [.exe, antiword.exe, arch.exe, awk.exe, base32.exe, base64.exe, basename.exe, bash.exe, bunzip2.exe, bzcat.exe, bzip2.exe, bzip2recover.exe, captoinfo.exe, cat.exe, certtool.exe, chcon.exe, chgrp.exe, chmod.exe, chown.exe, chroot.exe, cksum.exe, clear.exe, cmp.exe, column.exe, comm.exe, connect.exe, cp.exe, create-shortcut.exe, csplit.exe, curl.exe, cut.exe, d2u.exe, dash.exe, date.exe, dd.exe, df.exe, diff.exe, diff3.exe, dir.exe, dircolors.exe, dirname.exe, dos2unix.exe, du.exe, echo.exe, env.exe, envsubst.exe, ex.exe, expand.exe, expr.exe, factor.exe, false.exe, file.exe, find.exe, fmt.exe, fold.exe, funzip.exe, gawk-4.1.3.exe, gawk.exe, gdbmtool.exe, git.exe, gkill.exe, gpg.exe, gpgsplit.exe, gpgv.exe, grep.exe, groups.exe, gzip.exe, head.exe, hostid.exe, hostname.exe, iconv.exe, id.exe, infocmp.exe, infotocap.exe, install.exe, join.exe, kill.exe, ldd.exe, ldh.exe, less.exe, lessecho.exe, lesskey.exe, link.exe, ln.exe, locale.exe, locate.exe, logname.exe, ls.exe, mac2unix.exe, md5sum.exe, minidumper.exe, mintty.exe, mkdir.exe, mkfifo.exe, mkgroup.exe, mknod.exe, mkpasswd.exe, mktemp.exe, mount.exe, mv.exe, nice.exe, nl.exe, nohup.exe, nproc.exe, numfmt.exe, od.exe, openssl.exe, p11-kit.exe, p11tool.exe, passwd.exe, paste.exe, patch.exe, pathchk.exe, pdftotext.exe, perl.exe, perl5.22.1.exe, pinky.exe, pkcs1-conv.exe, pldd.exe, pluginviewer.exe, pr.exe, printenv.exe, printf.exe, ps.exe, psktool.exe, ptx.exe, pwd.exe, readlink.exe, realpath.exe, rebase.exe, recode-sr-latin.exe, regtool.exe, reset.exe, rm.exe, rmdir.exe, runcon.exe, rview.exe, rvim.exe, sasldblistusers2.exe, saslpasswd2.exe, scp.exe, sdiff.exe, sed.exe, seq.exe, setfacl.exe, setmetamode.exe, sexp-conv.exe, sftp.exe, sh.exe, sha1sum.exe, sha224sum.exe, sha256sum.exe, sha384sum.exe, sha512sum.exe, shred.exe, shuf.exe, sleep.exe, sort.exe, split.exe, srptool.exe, ssh-add.exe, ssh-agent.exe, ssh-keygen.exe, ssh-keyscan.exe, ssh-pageant.exe, ssh.exe, sshd.exe, ssp.exe, stat.exe, stdbuf.exe, strace.exe, stty.exe, sum.exe, sync.exe, tabs.exe, tac.exe, tail.exe, tar.exe, tclsh.exe, tclsh86.exe, tee.exe, test.exe, tic.exe, timeout.exe, toe.exe, touch.exe, tput.exe, tr.exe, true.exe, truncate.exe, trust.exe, tset.exe, tsort.exe, tty.exe, tzset.exe, u2d.exe, umount.exe, uname.exe, unexpand.exe, uniq.exe, unix2dos.exe, unix2mac.exe, unlink.exe, unzip.exe, unzipsfx.exe, users.exe, vdir.exe, view.exe, vim.exe, vimdiff.exe, wc.exe, which.exe, who.exe, whoami.exe, WhoUses.exe, winpty-agent.exe, winpty-debugserver.exe, winpty.exe, wish.exe, wish86.exe, xargs.exe, xmlwf.exe, xxd.exe, yes.exe, zipinfo.exe.
Note: Portable version available.
Source: cmder
/windows | Jun 04, 2016
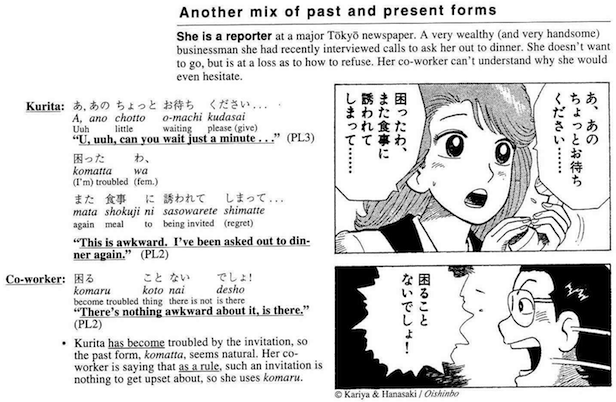
(Some might argue that the co-worker's response should be labeled PL3 instead of PL2, since he uses 「でしょ」 instead of 「だろ」 or 「だろう」)
Long out of print, digitized archives of all 70 issues float around the Internet; one kind soul has been hosting the first 30 issues for ages.
However, these days, you can turn almost any Japanese source image into a Mangajin-like smorgasbord of information thanks to two open source, portable apps from Christopher Brochtrup:
Capture2Text "enables users to quickly OCR a portion of the screen using a keyboard shortcut. The resulting text will be saved to the clipboard by default. Supports 90+ languages including Chinese, English, French, German, Japanese, and Spanish. Portable and does not require installation. See http://capture2text.sourceforge.net for details."
JGlossator "can create a gloss for Japanese text complete with de-inflected expressions, readings, audio pronunciation, example sentences, pitch accent, word frequency, kanji information, and grammar analysis. See http://jglossator.sourceforge.net/ for more information and screenshots. Inspired by Translation Aggregator, but aimed primarily at people learning Japanese."
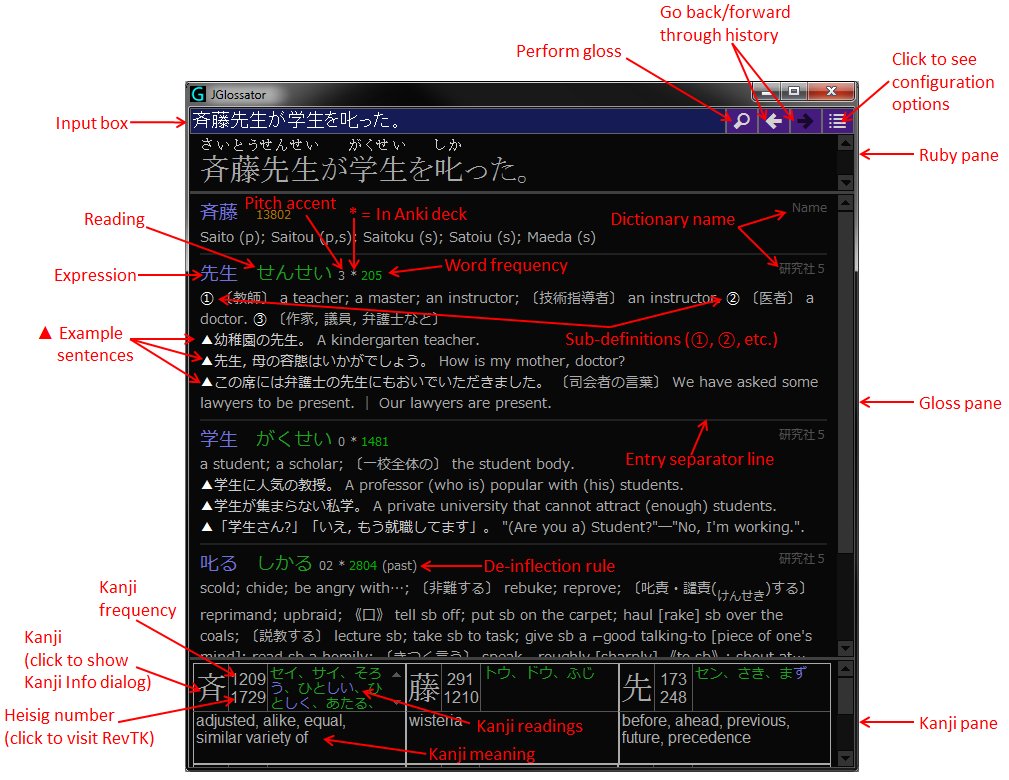
The two work seamlessly together; here is a video of them in action.
manga-ocr: "Optical character recognition for Japanese text, with the main focus being Japanese manga"
yomitan: "Pop-up dictionary browser extension for language learning. Successor to Yomichan."
Poricom: "Optical character recognition in manga images. Manga OCR desktop application"
mokuro: "Read Japanese manga inside browser with selectable text."
JP Lazy Guide "is for:
/windows | May 28, 2016
/windows | May 21, 2016
with SyncFolders. Features include: versioning (including auto cleanup of old versions), filtering, previewing, scheduling (via Windows' Task Scheduler), verifying (via CRC32, MD5, or SHA-1 hash), launching via command line, support for long file names and UNC paths, and more. Does not natively support VSS, but can be paired with ShadowSpawn to copy in-use files after configuring and saving job rules in the GUI; e.g.,
shadowspawn.exe C:\Users\foo Q: "C:\Program Files\SyncFolders\SyncFolders.exe" /background /synchronize C:\Users\foo\Documents\backup.rls /log:C:\logs\backuplog.txtwhich:
(To prevent "You do not have write access to folder Q:." when using this procedure, uncheck "Use local database to track file changes" in the Advanced tab for the rule.)
SyncFolders is unrestricted freeware and requires the .NET Framework.
/windows | May 17, 2016

 .
./misc | May 16, 2016
/mac | Apr 27, 2016
An unexpected error occurred.All other updates would install, but "Microsoft Error Reporting for Mac 2.2.9 Update" remained.
These applications were not updated:
Microsoft Error Reporting
/mac | Apr 24, 2016
During a malware cleanup, msconfig was used to change the boot method to Safe Mode with Networking (msconfig > Boot > Boot options > check Safe boot > check Network). On reboot, Windows would not load. Reverting the changes and returning to Normal Mode was done like so:
Boot from Windows install disc and open command prompt (Shift+F10)
Check the current boot mode:
X:\>bcdedit
...
Windows Boot Loader
-------------------
identifier {default}
...
nx OptIn
safeboot Network
Remove the Safe Mode with Networking option:
X:\>bcdedit /deletevalue {default} safeboot
The operation completed successfully.
Check boot mode again:
X:\>bcdedit
...
Windows Boot Loader
-------------------
identifier {default}
...
nx OptIn
BCDEdit can be used on offline drives via the "store" command (the help documentation oddly refers to it as a command instead of a flag or switch), e.g., bcdedit /store E:\Boot\BCD /deletevalue {default} safeboot. (Found this handy for editing BCD on a DiskCryptor-encrypted drive mounted inside of a Windows PE session.)
/windows | Apr 17, 2016
Windows' Problem Steps Recorder makes it easy to create step-by-step screenshots for troubleshooting, documentation, etc. However, annotation and output options are severely limited (see UPDATE 2 below).
Searching for a Windows program similar to MacSnapper1 or Explainer2, I stumbled upon Wink, a freeware, cross-platform screen capture tool that allows you to "[C]apture screenshots, add explanations boxes, buttons, titles, etc and generate a highly effective tutorial for your users." Additional features include audio recording, importing BMP/JPG/PNG/TIFF/GIF files, and exporting to PDF, PostScript, HTML, Flash, EXE, and the aforementioned image formats.
1 "Create lesson webpages and PDFs from snapshots and images"
2 "A screenshot app for those of us who explain 'computer stuff' to other people"
UPDATE 1: A few more macOS step recorder apps for creating manuals, documentation, guides, etc.:
UPDATE 2: On a recent documentation projection, I discovered that Microsoft Word can edit and export Problem Steps Recorder-generated MHT files quite robustly. Besides editing text, annotations like rectangles, arrows, callouts, and freehand drawings can be added to images (along with optional effects like transparency, shadows, etc) via Insert → Shapes. If you need still more, images can be exported via "Save as Picture...", edited/annotated in FastStone Capture or similar, then reimported via "Change Picture" → "From a File..." (the context menu's "Edit Picture" command apparently hasn't worked for ages on bitmap images).
/windows | Apr 14, 2016
Rescue Kit 14 Free Edition - "Complete collection of powerful rescue wizards that will help you to rescue your system and your data."
Paragon ExtFS for Windows - "Full access to Ext2 / Ext3 / Ext4 filesystem in Windows."
HFS+ for Windows 8/8.1 Free Edition - "Full access to Mac HFS / HFSX File System under Windows 8."
Paragon NTFS-HFS Converter - "Easily convert NTFS volumes to HFS+ volumes and vice versa"
Hard Disk Manager for Mac Preview - "Backup, recovery, partitioning and disk management"
VMDK Mounter for Mac OS X - Mount virtual disk images with full read/write access
Boot Camp Backup - Backup Windows Boot Camp volume under OS X
NTFS for Mac - "Full access to NTFS partitions under Mac OS X from 10.6 to 10.10"
NTFS & HFS for Linux 9.0 Express - "Transparent access to any NTFS or HFS+ drive within Linux operating system. Browse, read, change, copy and create new files and folders."
USB Plugin for Android - "Fast read and write access to any portable NTFS-formatted USB-attachable disk via Total Commander."
/misc | Apr 11, 2016
Windows Update was stuck overnight "Checking for updates..." on a virtually brand new, clean Windows 7 install. Tried the following:
Wish I had found this first - exact same issue and resolution: Windows 7: How I Solved the Infinite 'Checking for Updates' Hell.... More suggestions: Windows 7 SP1 Windows Update stuck checking for updates.
* If WSUS Offline Update gets stuck at Listing ids of missing updates (please be patient, this will take a while)..., open a second elevated command prompt and run net stop wuauserv.
UPDATE: Here is another protocol reported by good1dave to work reliably as of January 2017:
Don't forget to reenable automatic Windows Update checks.
/windows | Apr 06, 2016
According to the developers, "Apricity OS idles at around 500 megabytes of memory usage, as opposed to other popular operating systems that idle at up to several gigabytes. This also helps bring boot times down to just a few seconds." I found it fast and responsive running in a VM with just 2GB of RAM. Love the little coffee cup icon in the menu bar which functions much like OS X's caffeinate, though it has the added benefit of disabling the screensaver as well.
(via Hacker News)
/nix | Apr 03, 2016
/windows | Mar 30, 2016
"bulk_extractor is a program that extracts features such as email addresses, credit card numbers, URLs, and other types of information from digital evidence media. It is a useful forensic investigation tool for many tasks such as malware and intrusion investigations, identity investigations and cyber investigations, as well as analyzing imagery and password cracking. The program provides several unusual capabilities including:bulk_extractor operates on disk images, files or a directory of files and extracts useful information without parsing the file system or file system structures. The input is split into pages and processed by one or more scanners. The results are stored in feature files that can be easily inspected, parsed, or processed with other automated tools. bulk_extractor also creates histograms of features that it finds. This is useful because features such as email addresses and internet search terms that are more common tend to be important."
- It finds email addresses, URLs and credit card numbers that other tools miss because it can process compressed data (like ZIP, PDF and GZIP files) and incomplete or partially corrupted data. It can carve JPEGs, office documents and other kinds of files out of fragments of compressed data. It will detect and carve encrypted RAR files.
- It builds word lists based on all of the words found within the data, even those in compressed files that are in unallocated space. Those word lists can be useful for password cracking.
- It is multi-threaded; running bulk_extractor on a computer with twice the number of cores typically makes it complete a run in half the time.
- It creates histograms showing the most common email addresses, URLs, domains, search terms and other kinds of information on the drive.
Via Top 20 Free Digital Forensic Investigation Tools for SysAdmins, which offers this handy tip: "You will also see a decimal value in the first column of the text file that, when converted to hex, can be used as the pointer on disk where the entry was found (i.e. if you were analyzing the disk manually using a hex editor for example, you would jump to this hexadecimal value to view the data)."
/misc | Feb 29, 2016
Veeam Endpoint Backup FREE "provides a simple solution for backing up Windows-based desktops and laptops. With Veeam Endpoint Backup FREE, you can easily back up your PC to an external hard drive, NAS (network-attached storage) share or a Veeam Backup & Replication repository. And if your system crashes, hard drive fails, or a file gets corrupted or accidentally deleted, you can recover what you need in minutes — like it never even happened." See Backup to Rotated Drives and Managing Rotated Drives.
Reprofiler "offers a quick and easy way to see which profile is associated with which user. If a problem is evident, it then provides an intuitive and straightforward means of correcting the profile ownership."
PST Bridge allows viewing and exporting emails, contacts, calendars, tasks, and notes from PST files under OS X.
VClip and GifCam are screen capture tools that record video and audio (VClip only) from a defined area.
HitmanPro.Alert "protects your data against ransomware like CTB-Locker, CryptoWall and other cryptolockers." (UPDATE: WinAntiRansom also comes highly recommended)
Steven Black's hosts file "consolidates several reputable hosts files, and merges them into a single amalgamated hosts file with duplicates removed." Great for blocking malvertising while circumventing anti-adblock scripts. Sources (which can be easily extended) include:
"The Adaway hosts file, updated regularly.
MVPs.org Hosts file at http://winhelp2002.mvps.org/hosts.htm, updated monthly, or thereabouts.
Dan Pollock at http://someonewhocares.org/hosts/ updated regularly.
Malware Domain List at http://www.malwaredomainlist.com/, updated regularly.
Peter Lowe at http://pgl.yoyo.org/adservers/, updated regularly.
My own small list in raw form here."
grep -v '#' steves_hosts | awk '{print $1}'| sort | uniq -c/misc | Feb 26, 2016